Menu

alt

From Ugly to Something of Beauty

Some of my readers struggle with decorating your homes. You crave beauty in your home. But money won’t stretch for new furniture. What can you do?

We have lived on thrift-store finds, hand-me downs and street cast-offs our entire married life. There are times we’ve invested in new furniture, but those times were supplemented with what we found.

Just because you find it at a thrift store doesn’t mean you must live in a mis-matched, piece-meal home. You can make your home a place of beauty without much and with little ones under-foot.

How?
Refinish those treasured finds.

Over the years, I’ve found this gives me a creative pursuit that helps me during those “stuck at home” feelings when my husband is gone. After I’m finished refinishing a piece, it creates a part of the room where beauty rests.
Because I’m a messy painter, an impatient sander, and an experimenter I have found some short-cuts that help, and some that, well, won’t be mentioned.
Thought I’d share my most recent refinishing projects to encourage you with your attempts.

Now you can find plenty of pins on Pinterest or You-tube demonstrations that walk you through all the steps. Back in my day, I bought a Home Depot Book and learned a lot by error by skimping on what they said to do. But even the mistakes for me were better than leaving them as they were. They helped to create unity within the room and that unity helped create calm. As a mom of busy boys, I needed that calm somewhere, even if it was just looking at piece and knowing it belonged in this room.

You know those old dressers that have been around forever? They are solid wood, even the drawers don’t break. We had one, forever. Used by one of the boys, well—forever. When he didn’t need it anymore, I considered getting rid of it, but it was still good, just ugly. I didn’t take a before picture, but you could probably picture a light-colored wood in the finished picture.
I sanded it. (Something I hate doing. I get impatient at this stage and probably don’t do it enough.)
I used white chalk paint. Then found it must be protected with wax that doesn’t really protect it. (I didn’t use wax.) So now I had this white dresser I was afraid to use, because it would scratch and mark easily. This would not do for something I must use every day, even if I alone used it.

I smeared Vaseline on corners and random places over the white.
Then painted it with green paint I already had.
Once it had dried overnight, I wiped the areas where I had smeared the Vaseline.
The green paint came off, showing the white as a “distressed look.”
Now I can use it, with its protective latex green paint covering. 
The look grew on me and now I like it.

Another dresser had that light-colored-dated wood. Nothing matched it.
I sanded. (Probably not enough again.)
Stained it. The stain didn’t seem to cover it. It smeared on. Then I finished it with a polyfinish.
I stained and painted the drawer pulls. [Lost the bottom one :( ]
Ended up liking it.

Before 


After

Someone gave us their beautiful dining room set, after ours of twenty-some years (and that gifted to us, used) bowed if I rested my elbows on it.
The new set was a light wood.
Everything in my kitchen and dining room is stained mahogany or black. I accepted the gift. And acquired another refinishing project.

Used Klutz Kutter, instead of sanding, I washed off the table’s shine and poly finish, so the stain could adhere to the wood. Didn't even sand off the previous stain—I was making it darker anyway.

Those cheap foam brushes may be cheap, but I used as many of them to complete a project as it would have cost to purchase a good brush and throw it out afterward. (I can never clean the brush well enough to be soft and flexible again.)
So with this project, I tried a round, flexible brush.This worked miracles with the stain on the crevices of all the chair legs and backs. No brush strokes. It whisked into cracks and made a straight line, without taping.

FOR THE CHAIRS AND TABLE LEGS
Before staining, I again cleaned with Klutz Kleaner, which removed the shine and any grease. [It remains to be seen if I should have also sanded it a bit. Some flecks of stain coming off probably indicate I should have at least used steel wool on it. A lazy man does it twice. :(  Probably won't use Klutz Kleaner exclusively next time.]

I usually stain first then finish, in two steps.  But never liked the blotchy way the finish looked. This time I tried POLY STAIN by MINIWAX. This was both stain and finish in one step. 

I gave the stain a once-over first, even though it streaked and was patchy and didn’t cover it all. I went over it while still damp, caught the drips, evened out the thicker parts, and filled in the streaking—all with the stain giving a high gloss, stained finish. And the brush showing no brush strokes. Will use that again!

FOR THE TOP OF THE TABLE

I used PRE-STAIN by MINWAX. That helps the stain to go on evenly.
I used the mahogany stain with a roller. After the required dry time, instead of sanding, I used extra-fine steelwool to give a rough surface for the paint to adhere to. I didn't scrub too hard, but just gave a quick scrub, wiped the fine shavings and restained. Was pleased with the finish.
Allowed the table and chairs to "Cure" for several days without use. (That was the hard part. Eating on our laps in the living room was not comfortable.)

Before


After (with table inserts)

Often I have to look at the piece a long time before I decide what I will do with it. Is it worth the hassle or would it work fine left alone? Other pieces I knew when I found it that it would have to change, I just didn't know when. I reach a limit to looking at it "not fitting in" and must do it now.
I've always been glad that I've re-done a piece, if nothing more than to gain the satisfaction of something finished. 

Since patience isn’t something I’m overly blessed with, I did these projects either late at night, or early in the morning before little helpers woke to help and usually when my husband was gone. This time frame also helped me follow the required time between painting coats, because during the day, there's always a baby to feed, or an emergency that would frustrate the project (or me).
Because these things nourished my need to create and seek beauty, I could fore-go sleep for the long-term result.

Though not perfect, nor professional, and I’m not sure anyone else would purchase these “up-grades”—the end results contain more than their share of missed paint drips, and streaks— they helped create beauty and order for our home.

And that is something we as women do to make our house a home.


Displaying all 2 comments

A good reminder to look critically at the furniture we have (almost all secondhand) and see what could be instead of only what is! You've inspired me to maybe someday refinish some of it. :)

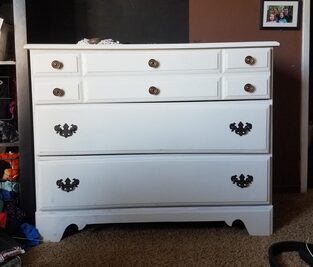
Love your ideas. I've never done anything like that, but Steve does it a lot. Do like the way your projects turned out, really lovely.

I write about what matters...to you---
women, wives and moms---
about your family, faith and future.
I write about what's hard, what helps and what heals.
I show you how it's done. And not done.
I hold your hand as you find what matters to the Savior.
And let go of those things that mattered to you, but not to Him.
I write about what matters...to Him.
               Sonya Contreras

Author of Biblical fiction, married to my best friend, and challenged by eight sons’ growing pains as I write about what matters.

Receive weekly articles by giving your email address below: